1. Using Vibration
Unlike computers, phones are held in the hand.
This makes vibration a useful mechanism to alert users that something
is happening with their phones. This is called haptic feedback.
Although haptic feedback is useful in some scenarios, its overuse is
discouraged. Use of vibration can affect battery life, so vibrating the
phone with every button click or other action isn’t recommended. In
general, using vibration is recommended for actions for which it can be
difficult to use a visual cue. Small touch points are a common place for
this, as the user cannot see the visual cue because his finger is often
in the way.
Combining vibration with visual cues can really
round out the user experience. To use haptic feedback, Windows Phone
provides a simple class called VibrateController (in the Microsoft.Devices namespace):
private void theButton_Click(object sender, RoutedEventArgs e)
{
VibrateController.Default.Start(TimeSpan.FromMilliseconds(100));
}
As you can see, the VibrateController
class provides a static property to access the default controller. From
there, you can start or stop the vibration. Typically, you would just
call Start with a short amount of time to give the user that haptic feedback. You can also use the Stop
method to cancel a long vibration, but in almost all cases you’re just
creating a very short vibration for the user to know he performed some
action in your application.
Emulator Tip
VibrateController will run in the emulator, but you won’t be able to tell it is working. That means the window won’t vibrate—really!
2. Using Motion
Every Windows Phone also has an accelerometer built in. The accelerometer
is a sensor that helps determine the phone’s speed and direction based
on its relationship to gravity. This means you can determine not only
its position in three dimensions (which is how the phone determines when
to change orientation), but also how much force is applied in each
direction. As a result, you can determine the direction as well as the
force in that direction. This is how some applications can test for
shaking or other movements of the phone. Phones starting with the 7.1
version of Windows Phone OS also have a gyroscope to increase the
sensitivity of this functionality.
The accelerometer works by showing the force
against gravity. The force is separated into three axes to allow you to
determine the location and force on the phone based on its relative
position to gravity. These axes (x, y, and z) relate to the phone’s
position, and each will typically be in the range of -1 to +1 based on
its position. If force is applied to the phone, these ranges can
increase to detect the amount of force. For example, when you shake the
phone the range will typically be greater than 1 or less than -1 to
reflect that you are applying a force to the phone greater than that of
gravity.
You can use this
information to determine the amount of tilt applied to the phone. You
can determine the tilt by comparing the value of each axis. These axes
are mapped to the phone itself, as shown in Figure 1 (using the emulator).
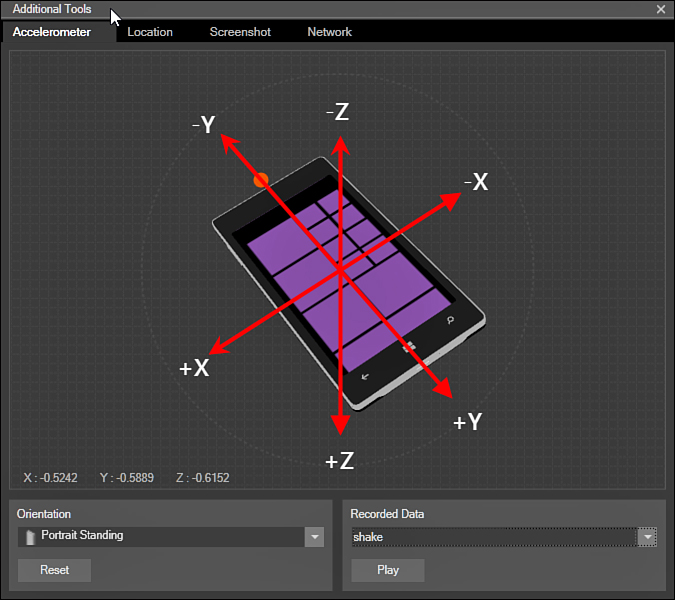
FIGURE 1 Accelerometer axes
Each axis has a negative and positive direction.
For example, when you are holding the phone in portrait mode, exactly
level with the ground, the y-axis will be -1 to represent that the top
of the phone is up. In that case, the x-axis will be zero because it is
halfway between lying down horizontally in either direction. This is the
case with the z-axis as well, because the front and back of the phone
are neither up nor down. Conversely, if you lay the phone (face-up) on a
perfectly flat table, the z-axis will be -1 and the other axes will be
zero. You can use the emulator to emulate moving the phone in
three-dimensional (3D) space to see how it can be affected.
On the phone, there are actually two different Accelerometer classes. One is from WinRT, and one is for use on the phone. Be sure to use the Accelerometer class from the Microsoft.Devices.Sensors namespace (not the one in Windows.Devices.Sensors). To use the class, you create an instance of it and register for the CurrentValueChanged event, like so:
public partial class MainPage : PhoneApplicationPage
{
Accelerometer _theAccelerometer = new Accelerometer();
// Constructor
public MainPage()
{
InitializeComponent();
_theAccelerometer. CurrentValueChanged +=
_theAccelerometer_CurrentValueChanged;
}
You will also want to determine how often you
want updates. This allows the accelerometer to notify you only as often
as necessary for your application. For example, if you’re writing a
tilt-based game, updates might be frequent (for instance, 100ms range).
You can set this by setting the TimeBetweenUpdates property of the Accelerometer class:
// Constructor
public MainPage()
{
InitializeComponent();
_theAccelerometer.CurrentValueChanged +=
_theAccelerometer_CurrentValueChanged;
_theAccelerometer.TimeBetweenUpdates =
TimeSpan.FromSeconds(1);
}
The Accelerometer class supports two methods for starting and stopping the accelerometer (not coincidentally called Start and Stop).
You should enable the accelerometer only when you actually need it.
Deferring its use until the user needs it is fairly typical. For
example, you might enable and disable it via buttons:
void startButton_Click(object sender, EventArgs e)
{
_theAccelerometer.Start();
}
void stopButton_Click(object sender, EventArgs e)
{
_theAccelerometer.Stop();
}
After you start the accelerometer, you will be notified as the readings change:
void _theAccelerometer_CurrentValueChanged(object sender,
SensorReadingEventArgs<AccelerometerReading> e)
{
var position = e.SensorReading.Acceleration;
// Update the User Interface
Dispatcher.BeginInvoke(() =>
{
xValue.Text = position.X.ToString("0.00");
yValue.Text = position.Y.ToString("0.00");
zValue.Text = position.Z.ToString("0.00");
});
}
The event argument (SensorReadingEventArgs<AccelerometerReading>)
will pass you two pieces of information: a timestamp of when the
reading changed and the sensor reading itself (in the form of an
instance of the SensorReading class). Inside the SensorReading’s Acceleration property will be the X, Y, and Z
values of the reading. Because the accelerometer can call you very
quickly, the calls to the event do not happen on the UI thread (so the
readings don’t overwhelm the user interface thread). If you want to
update the UI (like this example shows), you must marshal those calls to
the UI thread (which Dispatcher.BeginInvoke does nicely for you).
Tip
The accelerometer range is device-dependent. Don’t depend on a single device to determine what the acceptable range is.